この記事の特徴
| 重要度 | |
| 難易度 | |
| 備考 | アメブロ記事で使える線・罫線・区切り線のテンプレートです。記事の途中で区切りをつけて、読みやすく・分かりやすくできます。 |
この記事では、アメブロに下記のような線・罫線・区切り線の素材と引く方法を解説します。
記事の途中で区切る時に便利です。
記事本文と提供サービスを書く場所の区切りなどにも使えますね。


使い方はHTMLやCSSを知らなくてもOK、コピペして貼り付けるだけ。
しかもスマホやアプリで記事を見る読者にも対応。

デザインと色を選ぶとコードが自動で表示されます。コピーしてアメブロ記事内のHTML表示に貼りつけましょう。
記事後半には「設置の手順」や「使用上の注意点」も解説しているので、必要に応じて確認して下さい。

①シンプルな罫線・区切り線
シンプルな実線(①-A)
<hr style="border-top: 1px solid #7f9aeb; border-bottom: none;"> <p> </p>
<hr style="border-top: 1px solid #b6e1fc; border-bottom: none;"> <p> </p>
<hr style="border-top: 1px solid #94d175; border-bottom: none;"> <p> </p>
<hr style="border-top: 1px solid #e88289; border-bottom: none;"> <p> </p>
<hr style="border-top: 1px solid #f4aecc; border-bottom: none;"> <p> </p>
<hr style="border-top: 1px solid #fdc668; border-bottom: none;"> <p> </p>
<hr style="border-top: 1px solid #e89559; border-bottom: none;"> <p> </p>
- 線の太さ:「1px」の数字を変更
シンプルな点線(①-B)
<hr style="border-top: 2px dashed #7f9aeb; border-bottom: none;"> <p> </p>
<hr style="border-top: 2px dashed #b6e1fc; border-bottom: none;"> <p> </p>
<hr style="border-top: 2px dashed #94d175; border-bottom: none;"> <p> </p>
<hr style="border-top: 2px dashed #e88289; border-bottom: none;"> <p> </p>
<hr style="border-top: 2px dashed #f4aecc; border-bottom: none;"> <p> </p>
<hr style="border-top: 2px dashed #fdc668; border-bottom: none;"> <p> </p>
<hr style="border-top: 2px dashed #e89559; border-bottom: none;"> <p> </p>
- 線の太さ:「2px」の数字を変更
シンプルなドット線(①-C)
<hr style="border-top: 4px dotted #7f9aeb; border-bottom: none;"> <p> </p>
<hr style="border-top: 4px dotted #b6e1fc; border-bottom: none;"> <p> </p>
<hr style="border-top: 4px dotted #94d175; border-bottom: none;"> <p> </p>
<hr style="border-top: 4px dotted #e88289; border-bottom: none;"> <p> </p>
<hr style="border-top: 4px dotted #f4aecc; border-bottom: none;"> <p> </p>
<hr style="border-top: 4px dotted #fdc668; border-bottom: none;"> <p> </p>
<hr style="border-top: 4px dotted #e89559; border-bottom: none;"> <p> </p>
- 線の太さ:「4px」の数字を変更
シンプルな2重線(①-D)
<hr style="border-top: 5px double #7f9aeb; border-bottom: none;"> <p> </p>
<hr style="border-top: 5px double #b6e1fc; border-bottom: none;"> <p> </p>
<hr style="border-top: 5px double #94d175; border-bottom: none;"> <p> </p>
<hr style="border-top: 5px double #e88289; border-bottom: none;"> <p> </p>
<hr style="border-top: 5px double #f4aecc; border-bottom: none;"> <p> </p>
<hr style="border-top: 5px double #fdc668; border-bottom: none;"> <p> </p>
<hr style="border-top: 5px double #e89559; border-bottom: none;"> <p> </p>
- 線の太さ:「5px」の数字を変更
②短い罫線・区切り線
短くして中央に寄せた罫線です。線の両端に空白を作りたい時に使えます。
短い実線(②-A)
<hr style="border-top: 1px solid #7f9aeb; width: 80%; border-bottom: none;"> <p> </p>
<hr style="border-top: 1px solid #b6e1fc; width: 80%; border-bottom: none;"> <p> </p>
<hr style="border-top: 1px solid #94d175; width: 80%; border-bottom: none;"> <p> </p>
<hr style="border-top: 1px solid #e88289; width: 80%; border-bottom: none;"> <p> </p>
<hr style="border-top: 1px solid #f4aecc; width: 80%; border-bottom: none;"> <p> </p>
<hr style="border-top: 1px solid #fdc668; width: 80%; border-bottom: none;"> <p> </p>
<hr style="border-top: 1px solid #e89559; width: 80%; border-bottom: none;"> <p> </p>
- 線の太さ:「1px」の数字を変更
- 線の長さ:「width: 80%;」の数字を変更
短い点線・破線(②-B)
<hr style="border-top: 2px dashed #7f9aeb; width: 80%; border-bottom: none;"> <p> </p>
<hr style="border-top: 2px dashed #b6e1fc; width: 80%; border-bottom: none;"> <p> </p>
<hr style="border-top: 2px dashed #94d175; width: 80%; border-bottom: none;"> <p> </p>
<hr style="border-top: 2px dashed #e88289; width: 80%; border-bottom: none;"> <p> </p>
<hr style="border-top: 2px dashed #f4aecc; width: 80%; border-bottom: none;"> <p> </p>
<hr style="border-top: 2px dashed #fdc668; width: 80%; border-bottom: none;"> <p> </p>
<hr style="border-top: 2px dashed #e89559; width: 80%; border-bottom: none;"> <p> </p>
- 線の太さ:「2px」の数字を変更
- 線の長さ:「width: 80%;」の数字を変更
短いドット線(②-C)
<hr style="border-top: 4px dotted #7f9aeb; width: 80%; border-bottom: none;"> <p> </p>
<hr style="border-top: 4px dotted #b6e1fc; width: 80%; border-bottom: none;"> <p> </p>
<hr style="border-top: 4px dotted #94d175; width: 80%; border-bottom: none;"> <p> </p>
<hr style="border-top: 4px dotted #e88289; width: 80%; border-bottom: none;"> <p> </p>
<hr style="border-top: 4px dotted #f4aecc; width: 80%; border-bottom: none;"> <p> </p>
<hr style="border-top: 4px dotted #fdc668; width: 80%; border-bottom: none;"> <p> </p>
<hr style="border-top: 4px dotted #e89559; width: 80%; border-bottom: none;"> <p> </p>
- 線の太さ:「4px」の数字を変更
- 線の長さ:「width: 80%;」の数字を変更
短い2重線(②-D)
<hr style="border-top: 5px double #7f9aeb; width: 80%; border-bottom: none;"> <p> </p>
<hr style="border-top: 5px double #b6e1fc; width: 80%; border-bottom: none;"> <p> </p>
<hr style="border-top: 5px double #94d175; width: 80%; border-bottom: none;"> <p> </p>
<hr style="border-top: 5px double #e88289; width: 80%; border-bottom: none;"> <p> </p>
<hr style="border-top: 5px double #f4aecc; width: 80%; border-bottom: none;"> <p> </p>
<hr style="border-top: 5px double #fdc668; width: 80%; border-bottom: none;"> <p> </p>
<hr style="border-top: 5px double #e89559; width: 80%; border-bottom: none;"> <p> </p>
- 線の太さ:「5px」の数字を変更
- 線の長さ:「width: 80%;」の数字を変更
③かわいい罫線・区切り線
絵文字が入る区切り線(③-A)
アメブロの絵文字を中央に入れています。絵文字を自由に変えて使って下さいね。
<hr style="border-top: 4px dotted #7f9aeb; border-bottom: none;"><div class="i-amphtml-hidden-by-media-query" style="background: #ffffff; width: 35px; height: 30px; text-align: center; margin: -25px auto 0.5em auto;">ここに絵文字</div>
<p> </p>
<hr style="border-top: 4px dotted #b6e1fc; border-bottom: none;"><div class="i-amphtml-hidden-by-media-query" style="background: #ffffff; width: 35px; height: 30px; text-align: center; margin: -25px auto 0.5em auto;">ここに絵文字</div>
<p> </p>
<hr style="border-top: 4px dotted #94d175; border-bottom: none;"><div class="i-amphtml-hidden-by-media-query" style="background: #ffffff; width: 35px; height: 30px; text-align: center; margin: -25px auto 0.5em auto;">ここに絵文字</div>
<p> </p>
<hr style="border-top: 4px dotted #e88289; border-bottom: none;"><div class="i-amphtml-hidden-by-media-query" style="background: #ffffff; width: 35px; height: 30px; text-align: center; margin: -25px auto 0.5em auto;">ここに絵文字</div>
<p> </p>
<hr style="border-top: 4px dotted #f4aecc; border-bottom: none;"><div class="i-amphtml-hidden-by-media-query" style="background: #ffffff; width: 35px; height: 30px; text-align: center; margin: -25px auto 0.5em auto;">ここに絵文字</div>
<p> </p>
<hr style="border-top: 4px dotted #fdc668; border-bottom: none;"><div class="i-amphtml-hidden-by-media-query" style="background: #ffffff; width: 35px; height: 30px; text-align: center; margin: -25px auto 0.5em auto;">ここに絵文字</div>
<p> </p>
<hr style="border-top: 4px dotted #e89559; border-bottom: none;"><div class="i-amphtml-hidden-by-media-query" style="background: #ffffff; width: 35px; height: 30px; text-align: center; margin: -25px auto 0.5em auto;">ここに絵文字</div>
<p> </p>
④おしゃれ・かっこいい線・罫線・区切り線
グラデーション線(④-A)
<hr style="height: 3px; border-width: 0; background-image: linear-gradient( 90deg, transparent 0%, #7f9aeb 50%, transparent 100%);"> <p> </p>
<hr style="height: 3px; border-width: 0; background-image: linear-gradient( 90deg, transparent 0%, #b6e1fc 50%, transparent 100%);"> <p> </p>
<hr style="height: 3px; border-width: 0; background-image: linear-gradient( 90deg, transparent 0%, #94d175 50%, transparent 100%);"> <p> </p>
<hr style="height: 3px; border-width: 0; background-image: linear-gradient( 90deg, transparent 0%, #e88289 50%, transparent 100%);"> <p> </p>
<hr style="height: 3px; border-width: 0; background-image: linear-gradient( 90deg, transparent 0%, #f4aecc 50%, transparent 100%);"> <p> </p>
<hr style="height: 3px; border-width: 0; background-image: linear-gradient( 90deg, transparent 0%, #fdc668 50%, transparent 100%);"> <p> </p>
<hr style="height: 3px; border-width: 0; background-image: linear-gradient( 90deg, transparent 0%, #e89559 50%, transparent 100%);"> <p> </p>
- 線の太さ:「height: 3px;」の数字を変更
ストライプ線(④-B)
<hr style="height: 5px; border-width: 0; background: repeating-linear-gradient(to right, #7f9aeb, #7f9aeb 10px, #e0e7fa 10px, #e0e7fa 20px);"> <p> </p>
<hr style="height: 5px; border-width: 0; background: repeating-linear-gradient(to right, #b6e1fc, #b6e1fc 10px, #e7f5fe 10px, #e7f5fe 20px);"> <p> </p>
<hr style="height: 5px; border-width: 0; background: repeating-linear-gradient(to right, #94d175, #94d175 10px, #d6efbe 10px, #d6efbe 20px);"> <p> </p>
<hr style="height: 5px; border-width: 0; background: repeating-linear-gradient(to right, #e88289, #e88289 10px, #f5c7ca 10px, #f5c7ca 20px);"> <p> </p>
<hr style="height: 5px; border-width: 0; background: repeating-linear-gradient(to right, #f4aecc, #f4aecc 10px, #fbe4ee 10px, #fbe4ee 20px);"> <p> </p>
<hr style="height: 5px; border-width: 0; background: repeating-linear-gradient(to right, #fdc668, #fdc668 10px, #fee8c2 10px, #fee8c2 20px);"> <p> </p>
<hr style="height: 5px; border-width: 0; background: repeating-linear-gradient(to right, #e89559, #e89559 10px, #f6d4bc 10px, #f6d4bc 20px);"> <p> </p>
- 線の太さ:「height: 5px;」の数字を変更
斜めのストライプ線(④-C)
<hr style="height: 5px; border-width: 0; background: repeating-linear-gradient(-45deg, #7f9aeb, #7f9aeb 7px, #e0e7fa 7px, #e0e7fa 14px);"> <p> </p>
<hr style="height: 5px; border-width: 0; background: repeating-linear-gradient(-45deg, #b6e1fc, #b6e1fc 7px, #e7f5fe 7px, #e7f5fe 14px);"> <p> </p>
<hr style="height: 5px; border-width: 0; background: repeating-linear-gradient(-45deg, #94d175, #94d175 7px, #d6efbe 7px, #d6efbe 14px);"> <p> </p>
<hr style="height: 5px; border-width: 0; background: repeating-linear-gradient(-45deg, #e88289, #e88289 7px, #f5c7ca 7px, #f5c7ca 14px);"> <p> </p>
<hr style="height: 5px; border-width: 0; background: repeating-linear-gradient(-45deg, #f4aecc, #f4aecc 7px, #fbe4ee 7px, #fbe4ee 14px);"> <p> </p>
<hr style="height: 5px; border-width: 0; background: repeating-linear-gradient(-45deg, #fdc668, #fdc668 7px, #fee8c2 7px, #fee8c2 14px);"> <p> </p>
<hr style="height: 5px; border-width: 0; background: repeating-linear-gradient(-45deg, #e89559, #e89559 7px, #f6d4bc 7px, #f6d4bc 14px);"> <p> </p>
- 線の太さ:「height: 5px;」の数字を変更
単色のストライプ線(④-D)
<hr style="height: 7px; border-width: 0; background-size: 5px 5px; background-repeat: repeat; background-image: linear-gradient(-45deg, #ffffff 25%, #7f9aeb 25%, #7f9aeb 50%, #ffffff 50%, #ffffff 75%, #7f9aeb 75%, #7f9aeb);"> <p> </p>
<hr style="height: 7px; border-width: 0; background-size: 5px 5px; background-repeat: repeat; background-image: linear-gradient(-45deg, #ffffff 25%, #b6e1fc 25%, #b6e1fc 50%, #ffffff 50%, #ffffff 75%, #b6e1fc 75%, #b6e1fc);"> <p> </p>
<hr style="height: 7px; border-width: 0; background-size: 5px 5px; background-repeat: repeat; background-image: linear-gradient(-45deg, #ffffff 25%, #94d175 25%, #94d175 50%, #ffffff 50%, #ffffff 75%, #94d175 75%, #94d175);"> <p> </p>
<hr style="height: 7px; border-width: 0; background-size: 5px 5px; background-repeat: repeat; background-image: linear-gradient(-45deg, #ffffff 25%, #e88289 25%, #e88289 50%, #ffffff 50%, #ffffff 75%, #e88289 75%, #e88289);"> <p> </p>
<hr style="height: 7px; border-width: 0; background-size: 5px 5px; background-repeat: repeat; background-image: linear-gradient(-45deg, #ffffff 25%, #f4aecc 25%, #f4aecc 50%, #ffffff 50%, #ffffff 75%, #f4aecc 75%, #f4aecc);"> <p> </p>
<hr style="height: 7px; border-width: 0; background-size: 5px 5px; background-repeat: repeat; background-image: linear-gradient(-45deg, #ffffff 25%, #fdc668 25%, #fdc668 50%, #ffffff 50%, #ffffff 75%, #fdc668 75%, #fdc668);"> <p> </p>
<hr style="height: 7px; border-width: 0; background-size: 5px 5px; background-repeat: repeat; background-image: linear-gradient(-45deg, #ffffff 25%, #e89559 25%, #e89559 50%, #ffffff 50%, #ffffff 75%, #e89559 75%, #e89559);"> <p> </p>
- 線の太さ:「height: 7px;」の数字を変更
アメブロの記事に線を引く方法
アメブロでの区切り線の引き方を解説します。
線のデザインを選んでコードをコピペ
使いたい線のデザインと色を、この記事から選んで下さい。
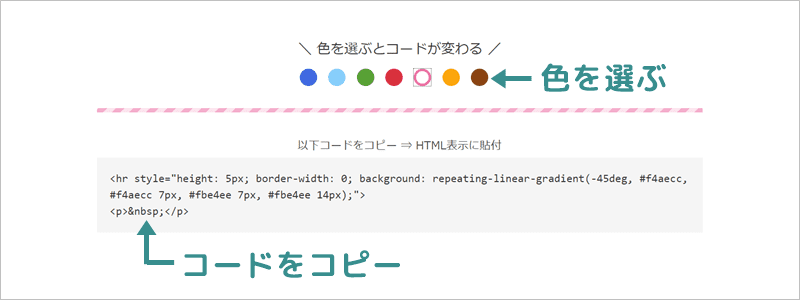
色を選ぶと、各デザインの下にコードが表示されるのでコピーします。

アメブロに貼り付けて中身を書く
アメブロ記事作成画面で「HTML表示」に切り替えて、コードを貼り付けます
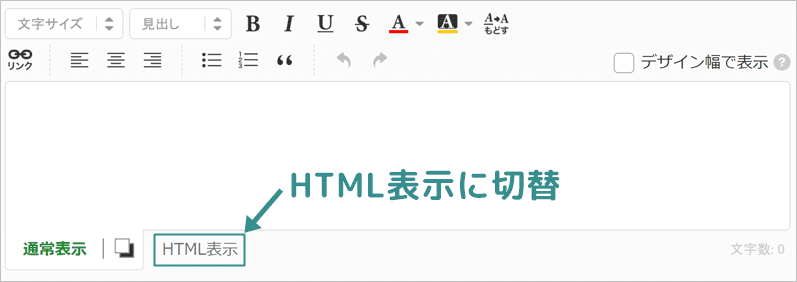
貼り付けたら、記事作成画面を「通常表示」に戻しましょう。

「通常表示」に戻ると下記のように区切り線が入ります。

これでアメブロにも区切り線ができました。次の行に続きを書きましょう。

線・罫線・区切り線の活用法
「使用上の注意点」でも書いていますが、記事本文の途中で段落のように区切るのは不利なので用途は限られます。
ボックス内部を区切る
例えば下記のようにボックスの途中に入れて、見やすくするなどの工夫には使えます。
例えばこのようにボックスの内部の仕切りに使うことはできます。
上下で分けた方がいい時などは便利ですね。
記事本文の後に線を引く
記事本文を書き終わった後に、他の関連する記事やあなたの提供サービスへ誘導する「アピールスペース」を作る場合がありますよね。
その場合の区切り線として使うのもおすすめです。
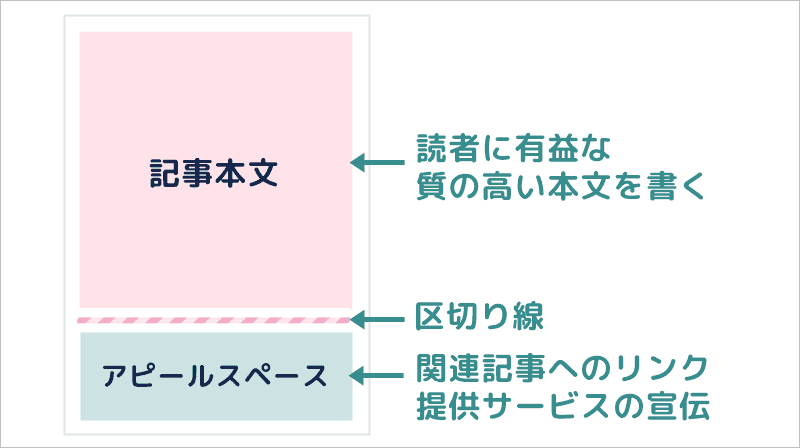
記事本文と分けてあると、読者にとって分かりやすくなります。
ただし記事本文が短く、宣伝目的のアピールスペースが長い記事を作らないように注意しましょう。
読者にとってメリットが少ない記事を量産するのは逆効果なので、時間がかかっても質の高い記事本文を書いて下さいね。

使用上の注意点
本文途中の区切りとして使うと不利
記事の本文が長くなった時に、区切り線として使えますが集客面で不利です。
記事本文の途中で区切る場合は、「見出し」を優先して使いましょう。
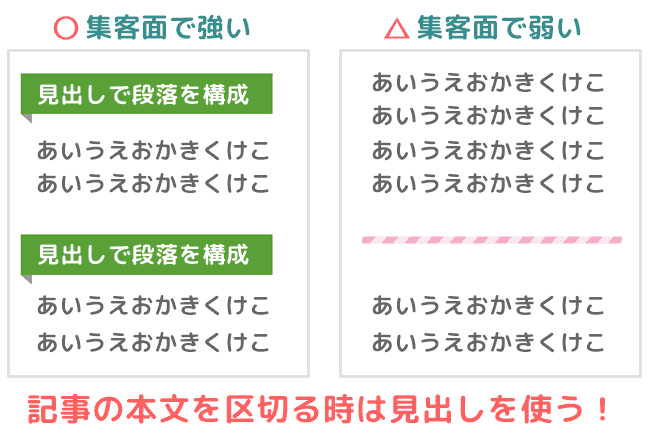
「見出し」は段落を構成して、記事内を区切ることができます。
さらに「見出し」にキーワードを設定して検索エンジンからのアクセス数UPを狙うのは、アメブロの基本ですよね。
罫線や区切り線ではSEO対策にならないので、本文の途中で区切る場合は「見出し」を使った方が有利です。
記事の中で区切り線を多用している人は、見出しに変えるだけでアクセス数がUPする可能性もありますね。

文字や記号で区切り線を作らない方がいい
アスタリスクなどの記号で区切り線を作る人も一部いますが、やめておきましょう。
スマホで見ると区切り線が中途半端に改行されてしまいます。
この記事で紹介している区切り線のコードを使えば、スマホでも自動的に幅が調整されるので便利です。
WEBサイトには区切り線専用のコードがあるので、メールのような区切り線を使うのはやめましょう。


